> For the complete documentation index, see [llms.txt](https://docs.solutioo.de/llms.txt). Markdown versions of documentation pages are available by appending `.md` to page URLs; this page is available as [Markdown](https://docs.solutioo.de/shopware/shopware6_en_us/configuration/basic-settings/inventory-configuration.md).
# Inventory Configuration
The inventory settings determine how inventory levels are synchronized between Business Central and Shopware.
## 1. Inventory Settings
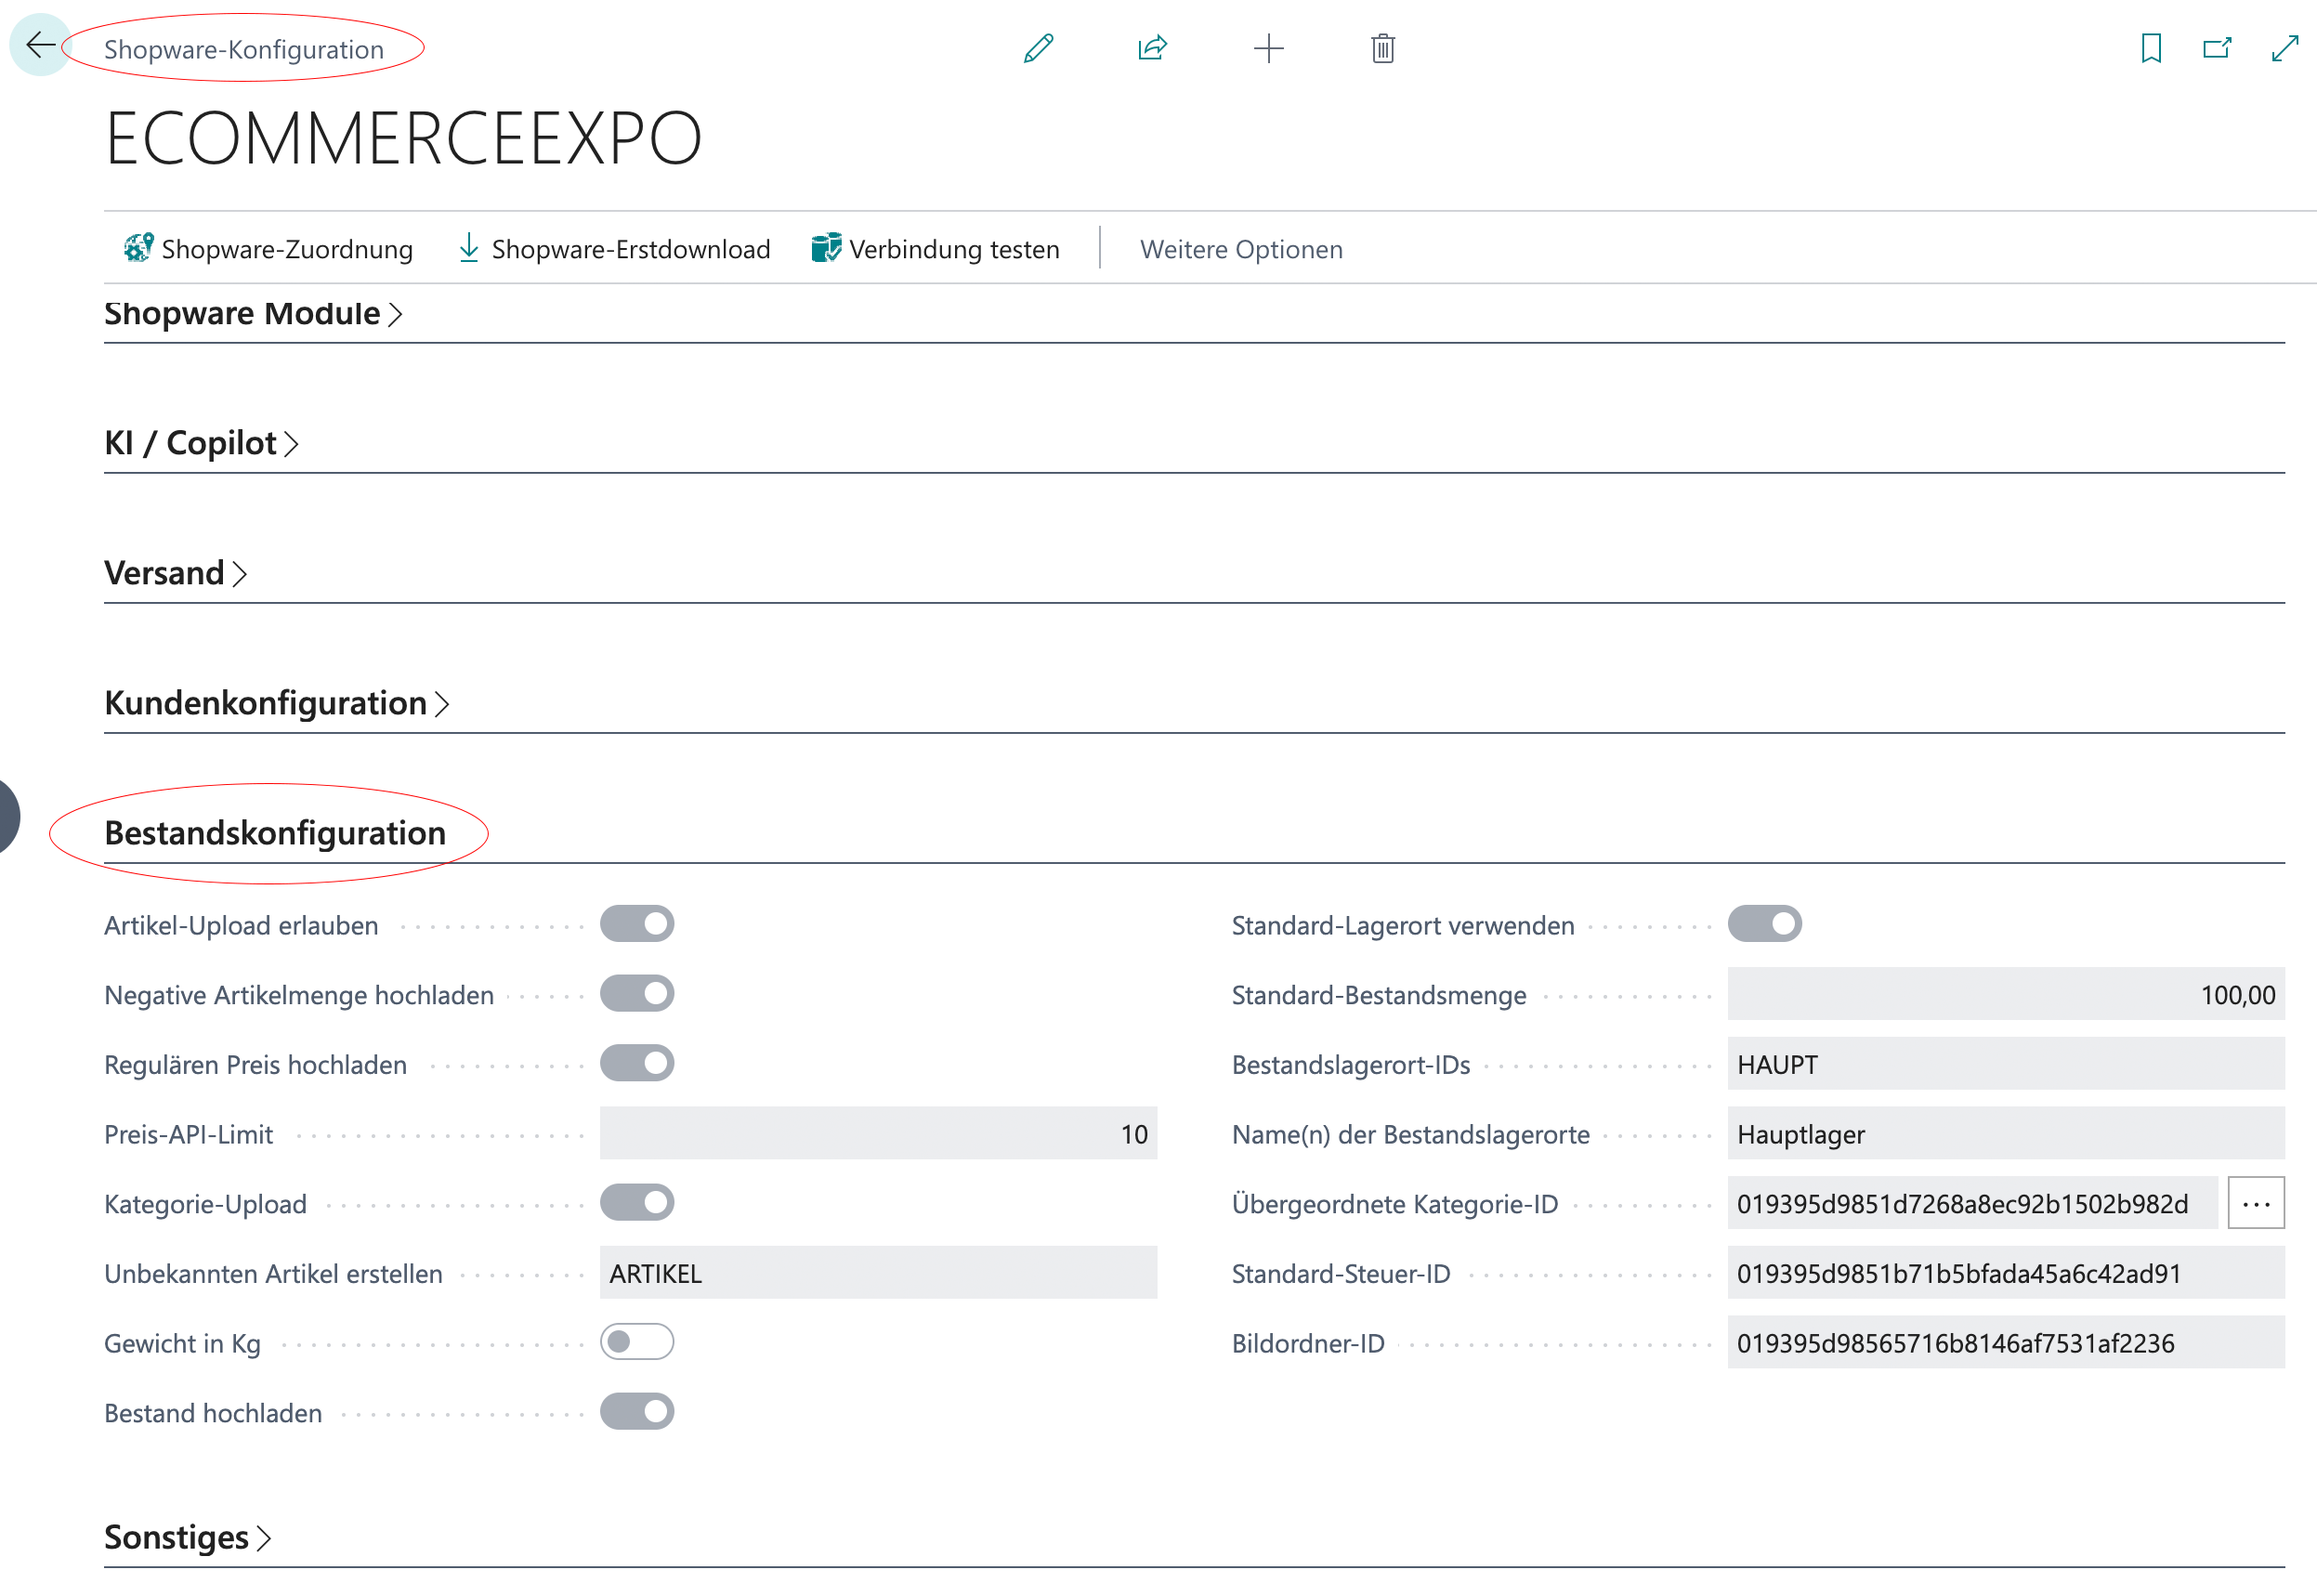
Navigate to *"Shopware"* :right: *"Configuration"* and switch to edit mode by clicking the "pencil icon" at the top of the newly opened window. Editing is now enabled.
* **Allow Item Upload**\
**YES** :right: Allows items to be uploaded from Business Central to Shopware.
* **Upload Negative Item Quantity**\
**YES** :right: If an item has a negative quantity in Business Central, this setting allows it to be uploaded to Shopware anyway.\
**NO** :right: If this option is disabled, no negative quantity is uploaded to Shopware. Instead, the value "0" and "In Stock" are transmitted.
* **Upload Regular Price**\
**YES** :right: Uploads the standard Unit Price from the item in Business Central to Shopware, regardless of role-based prices.
* **Price API Limit**\
Here you define how many prices from the price table are transmitted with a single API request.\
If many prices are adjusted at once, it is worth increasing this value to ensure the fastest possible update.
* **Category Upload**\
**YES** :right: Allows item categories to be uploaded to Shopware.
* **Create Unknown Item**\
Here you store a template that is used when items are downloaded from Shopware orders because they do NOT exist in Business Central. As a rule, this is: *"ITEM"*
* **Weight in kg**
* **Upload Inventory**\
**YES** :right: Allows inventory levels to be uploaded to Shopware.
* **Use Default Location**\
**YES** :right: Ignores the locations and uses the defined fixed inventory.
* **Default Inventory Quantity**\
Default inventory quantity that is used for all items when "*Use Default Location*" is enabled.
* **Inventory Location IDs**\
Here you define the locations that are to be uploaded to the Shopware shop. This lets you manage precisely which location or locations the shop sources products from.\
Example:\
Location 1 and Location 2: goods for online shop DE\
Location 3: goods for the retail store\
Location 4: goods for online shop AT
* **Name(s) of the Inventory Locations**\
This field is filled automatically based on the data from "*Location IDs*" and simply provides a clearer overview when the IDs are not very meaningful.
* **Parent Category ID**\
Shopware ID for the parent category (see [Authentication to the Online Shop](/shopware/shopware6_en_us/configuration/authentication-to-the-online-shop.md))
* **Default Tax ID**\
Shopware ID for the default tax ID (see [Authentication to the Online Shop](/shopware/shopware6_en_us/configuration/authentication-to-the-online-shop.md))
* **Image Folder ID**\
Shopware ID for the default item picture folder (see [Authentication to the Online Shop](/shopware/shopware6_en_us/configuration/authentication-to-the-online-shop.md))
## 2. Finding ID Errors
### 2.1 Parent Category ID
1. Open the *Shopware back end.*
2. Navigate to *Catalogues → Categories.*
3. Click the category you want (for example "Home").
4. You will find the ID in the URL:
```
https://your-shop.com/admin#/sw/category/index/[CATEGORY-ID]/
```
### 2.2 Image Folder ID
1. Open the *Shopware back end.*
2. Navigate to *Content → Media.*
3. Click the folder you want (for example "Product Media").
4. You will find the ID in the URL:
```
https://your-shop.com/admin#/sw/media/index/[FOLDER-ID]/
```
## 3. Tiered Price Import
The *tiered price limit* defines the maximum number of tiers per product that may be imported.
{% hint style="info" %}
Set the limit according to your business requirements. A limit that is too high can affect performance.
{% endhint %}
## 4. Tips for Day-to-Day Use
{% tabs %}
{% tab title="Inventory accuracy" %}
* Carry out regular physical inventories.
* Check the inventory differences between the systems.
* Use the activity log for error analysis.
{% endtab %}
{% tab title="Performance" %}
* Synchronize inventory outside of peak hours.
* Limit the number of items synchronized at the same time.
* Use filters for selective updates.
{% endtab %}
{% endtabs %}
---
# Agent Instructions
This documentation is published with GitBook. GitBook is the documentation platform designed so that both humans and AI agents can read, navigate, and reason over technical content effectively. Learn more at gitbook.com.
## Querying This Documentation
If you need additional information that is not directly available in this page, you can query the documentation dynamically by asking a question.
Perform an HTTP GET request on the current page URL with the `ask` query parameter, and the optional `goal` query parameter:
```
GET https://docs.solutioo.de/shopware/shopware6_en_us/configuration/basic-settings/inventory-configuration.md?ask=&goal=
```
`ask` is the immediate question: it should be specific, self-contained, and written in natural language.
`goal` is optional and describes the broader end goal you are ultimately trying to accomplish on behalf of the user. GitBook uses it to tailor the answer towards what is most useful for that goal.
The response will contain a direct answer to the question and relevant excerpts and sources from the documentation.
Use this mechanism when the answer is not explicitly present in the current page, you need clarification or additional context, or you want to retrieve related documentation sections.